Showing posts with label Makeup. Show all posts

Friday, 20 March 2015

MOTD | 15TH MARCH 2015

This is a very belated MOTD (Make/Makeup of the day) post because I have the bad habit of procrastinating I'm sorry :<

Took photos with my newly bought ring light! (Read my previous post to read about my views on it!)

I feel the need to warn you that I have weird facial expressions.

PICTURE HEAVY POST!


On the face:

Primer: Dior Skin Refining Matte Primer

Base: Diorskin Radiant Base in 002

Foundation: Benefit Cosmetics Hello Flawless Oxygen Wow Foundation in Honey

Under-eyes: Benefit Cosmetics Erase Paste in No. 2 Medium

Eye & Concealer Primer: Benefit Cosmetics STAY DON'T STRAY in Light/Medium

Concealers: Benefit Cosmetics Boi-ing Concealer in 02 & 03

Powder: NARS Light Reflecting Setting Powder - LOOSE in Translucent Crystal

Eyeshadow: Inglot Eyeshadow Orange Trio

Eyeliner: Dolly Wink Eyeliner in Brown

Eyebrows: BROWLASH EX in Natural Brown

Eyelashes: Majolica Majorca Lash Fiber, DECORATIVE EYELASH in Play Cute #06, Too Faced
Better Than Sex Mascara

Bronzer: NARS Laguna Bronzing Powder

Blusher: NARS Orgasm

Highlighter: NARS Albatross

Lips: Wild. Luscious Lip Balm in Pomegranate Shimmer, Tarte Amazonian Butter Lipstick in Plummy
Rose, Chanel Lipgloss in 68

Setting Spray: Urban Decay All-Nighter Makeup Setting Spray

More pictures! :>


The two pictures featuring my phone is actually how I answered my phone the whole entire day! My pompom earrings were too big and fluffy that they kept getting in my way! XDD

I still love them loads though! :>


Thank you for staying till the end! :>

Cheers,
Diiyawn

Monday, 16 March 2015

FAVS & REVIEW | All-Time Makeup Favorites For The Face (+Reviews)

I feel really good when people tell me 'Wow! You have really nice skin!' Seriously! Who wouldn't feel good when people compliment you?

I'll then blush a little and tell them 'Aww! Thanks! It's not really my 'real' skin though! xD Its more of my makeup!! I actually have '5' layers of makeup on my face!' To which they'll reply me 'HUH?! 5?! I couldn't tell at all!! Are you serious?' with a (OAO) expression on their faces.

'Yea,' I'll tell them.

'My first layer consists of a primer, my second layer consists of a makeup base, my third layer consists of a liquid foundation, my fourth layer consists of 3 shades of concealer and my fifth and final layer consists of a loose powder!!'

'BUT YOUR MAKEUP LOOKS SO NATURAL!!!'

Okay, I'm venturing into bragging(?) now? But it's legitimate okay, I have reasons to brag thanks a lot. I spend a lot of time perfecting my foundation so let me brag all I want thank you. While perfecting my foundation (this sounds weird), I finally understood what other makeup artists meant by 'blending'.

Blending really plays a huge part in makeup, because it helps to make your makeup meld with your skin perfectly so that it'll look like a 'second skin' and be natural looking instead of being cakey looking.

Instead of just applying the product to your face, 'blending,' to me, means to make sure that your product is 'thinned out' and buffed properly into your skin. Apllying a product to your face takes no more than 2-3 mins, but blending may require a bit more time as you have to spread the product and make sure that it is one thin layer on your face instead of it being patchy.

For my foundation, I use the following products.

 (From left to right) Benefit Stay Don't Stray, Benefit Boi-ing Concealer in 02/03, Benefit Erase Paste in 02, NARS Light Reflecting Loose Setting Powder, CD DIORSKIN Radiant Base in 02, CD Pore Minimizer and lastly, Benefit Hello Flawless Oxygen Wow in Honey

For the brushes I use,


(From left to right) Real Techniques Buffing Brush, Ecotools Foundation Brush, Ecotools Concealer Brush, Tarte Airbuki Foundation Brush and lastly, Tarte The Buffer Foundation Brush

I normally jump between different brushes but the ones that I use the most are these!

The first 3 brushes are pretty good and affordable brushes! You can get them at Watsons! The RT Buffing Brush comes from the RT Core Collection if I'm not wrong, 4 for $39.90, though you can also get Real Technique brushes from under-twenty20, which I frequently get things from! You can get quite a lot of good things from there for affordable prices, the site is really trustworthy and they are also really efficient!! You can also get Ecotools from the same site!

The other two Tarte brushes are good but although they aren't overly expensive, they still left quite a gaping hole in my pocket. I can't recall the exact price of the brushes but the Airbuki Foundation Brush was $47(??) while the The Buffer Foundation Brush was $49(??). Bought them earlier in the year so I am not really sure, but definitely over $45! I remember thinking for quite a while whether I should get it or not!

Good brushes, to me, are easier to handle and navigate, do not shed easily, and are fluffy with soft yet dense bristles!

Having dense bristles are important!! I really hate brushes that are large and fluffy yet not dense, because they don't deposit the product accurately on my face. To keep it short, the brushes don't follow orders well, the bristles don't go where I want them to go. They go in all different directions and are really difficult to control, which makes blending really difficult.

OKAY, enough about brushes! Lets get on to the foundation routine!

Step 1:
I start off my foundation routine with my Pore Minimizer! It is a Skin Refining Matte Primer, which helps to minimize the appearance of my pores, as well as to help control the amount of oil that appears on my face, which is really helpful because I have oily skin )=

One thing I learnt from using this, is that less is more really works in this case, because no matter how much you put, it'll still have the same effect, so why waste the product by overusing it? Another thing is that when you use more, it'll clog up and look fake!

I use my Ecotools foundation brush to apply this! I apply this product using horizontal stripes all over my face, starting from the center of my face and ending at the outer corners of my face! This creates a really smooth canvas for me to work on later!

This primer is good in the sense that it can be used under or over your makeup as touch-up! I really like this fact because I can cover all the oily spots as the day wears on without being afraid that this primer will mess up my makeup! If you use powder to touch up your makeup and you have oily skin, your skin might potentially change the color of the powder and sigh, your makeup will be messed up!!

Step 2:
I use my Dior Radiant Base in 02. Once again, my Ecotools foundation brush is used to apply this product!! ---> I really need to get another good foundation brush LOL, using two products with one brush isn't really all that hygienic D<

Similar to the primer, the 'less is more' theory works too. This product is a Skin-Refining Makeup Base that helps to prep the skin and helps to even out the skin tone! This is perfect for me as I have an uneven skin tone! My forehead is a shade darker than my face and my cheeks are redder than the rest of my skin! I also occasionally get heat rashes and red patches here and there so sometimes, my skin looks really weird.

Step 3:
Now, I use my Benefit Hello Flawless Oxygen Wow Liquid Foundation in Honey! I have experimented with multiple different kinds of liquid foundation and non has captured my heart and fitted me so thoroughly like Benefit's Liquid Foundation in Honey!!

I use my Tarte The Buffer foundation brush to apply this! I really love this brush because it is really dense yet it has soft bristles! It also provides me with a full coverage and helps me with covering most of my blemishes, which helps me to save money on my concealers.

A little of this foundation can already efficiently provide me with a thorough coverage while still keeping it looking really natural! I know that I have overused the word 'natural' but that is precisely what I am trying to push here! A natural look!

Step 4:
Concealer time!! As the liquid foundation helps to cover most of my blemishes! I do not need much concealer at all!! I start off by using Benefit's Stay Don't Stray in Light/Medium. This is a primer that helps both eyeshadows and concealers to stay put! I dab this on my blemishes, as well as my under eye area and blend it in with my fingers! After it is well blended, I use Benefit's Erase Paste in No.2 Medium. It helps to brighten and camouflage when used on the eyes and the face! I apply this at my under eye area, the inner corner of my eyes, the sides of my nostrils, my nasal labia fold (the line running from your nose to your mouth) as well as at the corners of my mouth because those are the only areas that requires brightening! I don't apply the paste to my blemishes though, because it'll only brighten them and draw more attention to them, which is a huge NO-NO!

I use my Ecotools concealer brush to dab the Erase Paste onto my designated areas, before using my fingers to blend them well! After this step, I use my Benefit Boi-ing concealer in 02/03 on my blemishes as well as my eye-bags and eye-rings! This concealer is quite pigmented, so only a little is really needed! I like this point because only a little is needed and therefore it lessens the chance of a cakey look!! I really really hate cakey looks! It looks so '......' I don't even know how to describe how I feel about it. For the concealer, I dont use the concealer brush, but instead my fingers to apply it! For certain products, like cream products, I find that fingers work a lot better than brushes, because your body heat helps to warm up the products and make them easier to work with! Like thanks to my fingers, my concealer is easily blended into my skin.

Step 5:
THE LAST STEP!!! The finishing touch is delivered using the NARS Light Reflecting Loose Setting Powder! This powder has utterly despoiled me. I can never ever see myself using any kind of powder every again. I'm really serious. I SWEAR THIS.

I apply this powder to where I applied my concealer and erase paste to help set them using my Real Techniques buffing brush. After setting my concealer and all, I use my Tarte Airbuki Foundation Brush to brush the powder over my whole face to set everything else! Why don't I just use one brush to powder my whole face at one go? Well, first of all, the RT buffing brush has a flat circular head which enables me to reach and powder the difficult to reach areas such as my under ere area properly! Also, I have to set my concealer first and powder ym face separately, because if I powder it all at once, the sweeping motion will move my concealer and i'll lose coverage!! So yes, two different brushes and two different motions to set my powder!

This powder really is my holy grail! It can be used with or without foundation. This powder is so fine that it helps to fill in all the gaps that may have not been completely covered by the primer and makeup base. Well, to me, I think that this powder turns what is 'FAKE' into 'REAL', if my foundation doesn't look completely natural, this powder certainly makes sure it does!!

The secret of this powder is that it is a mix of white and reddish looking powder (I think its titanium dioxide and iron oxide respectively). This gives you a slight pinkish look after you apply it on your face! It's so fine and translucent looking and doesn't make you look like you covered your face in chalk powder or something as some white powders tend to do!!

I mentioned that it can be used with or without foundation and it is really true! I tested it out once! It's still my skin color, with a slight flush, except that my skin looked and felt so much smoother ! It also evened out my skin tone!

It also consists of ingredients that helps our skin! It has Glycerin and Vitamin E inside of it that helps to nourish and protect out skin and other ingredients that helps to diffuse light so that you'll always look good!!

This is one of my favorite products and therefore I included a picture of it too!


AHHHHHHHHHHH. I'm done with this!! I took like close to 4 hours to write this! I had to think of how to write and make it flow properly! This is like a mix of reviews and a favorites post!

Hope that you enjoyed reading this!

Cheers,

Diiyawn


Tuesday, 10 March 2015

Hong Kong Makeup Haul

Disclaimer first!

This is going to be a picture heavy post!

Reviews of each product will be posted individually when I'm free! :)

HAHAHA OKAY WE CAN GET STARTED NOW! :)

In my previous post, I mentioned that I went to Hong Kong (Does anyone remember?) and that was where I bought my Cath Kidston Makeup Brush Set from. However, that sure wasn't the only makeup related item I bought there! I just didn't put the brushes in this post because the brush post was a review while this post is about my makeup haul!

Sorry for the ramble! We can finally start now! XD


JENGJENG~!! These are the stuff I bought! I will talk about the items in the order that I do my makeup! The only exception being the magazine.

I bought a JILL STUART magazine~ huehuehue.


Anyone can guess why I bought this magazine?

If you said it's because this magazine is pretty, you're only 1/4 right hehehe.

I bought it for the freebie AHAHAHAHAHA!!!

I wanted this makeup pouch really badly okay! Other than the fact that it is from Jill Stuart and that the print is really cute, there's also the fact that I need a makeup pouch :>


How the pouch looks like compressed~ its fold friendly so don't worry~


How the pouch looks normally~

Love the prints and the zip!

The handle is in the form of a ribbon! HOW CAN THIS GET ANY CUTER ALREADY OH MY GOD.


How the pouch looks like when it is open~

The top flap has a netted pouch with a zip for you to put small things that you may need while bringing your cosmetics out. For example, Q-tips and the likes of it.

I don't think that it is visible in this picture but in the pouch, there are actually sectioned holders for you to put items that you would like to stand! For example, mini makeup brushes, liquid concealers and maybe lip glosses too!

Okay~ now we can get started on the products! :D

I have really oily skin, so primers are a must for me!

I got two primers on this trip! One is my holy grail and the other one is one I just wanted to try out ehehehe.


THIS IS MY HOLY GRAIL. Dior's SKIN REFINING MATTE PRIMER! It was so good that I ran around like a headless chicken in Hong Kong looking for it when mine ran out. I really tried to squeeze the tube until it was empty okay!! My existing tube looks like a mauled tube of toothpaste LOL.

Apparently, this was as precious to the people in Hong Kong as it was to me, because all 8 stores that I went to, had this item out of stock. Sigh. I was kind of sad, until I realised that Hong Kong sold this primer at a higher price than Singapore did.

I waited till I got back to Singapore's DFS to purchase it. Luckily it was only a 4-day trip so my already depleted tube didn't have to suffer for much longer.

The primer I bought to try out was 3CE's Pore Silky Balm!


I decided to try it because I heard good reviews and because I have been hoping to find a cheaper alternative to my holy grail (Admit it, who doesn't want to save money LOL). Haven't tried this yet! Will do a review post after I've tried it out! If I write down my thoughts on this now, I'll probably have nothing left to write after.

Next is the foundation~ I restocked my favourite liquid foundation, Benefit Cosmetic's Hello Flawless Oxygen Wow in Honey!


If you read my post on Benefit's foundation kit, you would know how much I love the foundation. For liquid foundation, this is my holy grail. Never, have I found a foundation that suited me so well until I tried this. The colour is great, it's coverage is fantastic, it's light on the face, it looks natural. What more can I say. This definitely deserves a review on its own.

Normally, I use two different kinds of foundation on my face to help control the amount of oil, so I went ahead to purchase powder foundation, the pressed kind! Because I realised that all the powder foundation I have are the loose kind LOL.

The first one I got was the JILL STUART Foundation Compact & Powder.


The lovely silver jewelled powder compact~


It comes with a lovely rose tassel! How adorable!!


A sponge is provided too! This is nothing new but their sponge is pink! Fits their product perfectly!


There is a mirror attached to the underside of the sponge rest~ there is a sheet of clear plastic over their product to keep it sanitary. I find it annoying but I still keep it LOL.


I don't think that you can see clearly from the pic (Because I've already used the powder I'm sorry) but there are actually engravings resembling the powder compact on the pressed powder itself! Will do a review of it!

The other powder I bought is the MAC Prep + Prime Translucent Pressed Powder!


Was trying to find a cheaper alternative to my NARS Light Reflecting Loose Setting Powder :>

I always loved using translucent powder because by doing so, your makeup will look more natural and less cake-y because this doesn't help to add on to your pigments, but rather, help to set it as well as to lock it in place! :)

After setting my foundation and all, I would normally do my brows first! I bought a Dolly Wink Brow Mascara~


This doesn't really count as a restock of sorts because I never owned a Dolly Wink Brow Mascara in the first place HAHAHAHAHA XD

I do, however, own a Majolica Majorca Brow Mascara and it did my brows pretty well, except that after I dyed my hair, it was too dark for me...hence the new purchase!

I bought mine in the lightest shade Maple and I have to say that this goes on really well, it coloured my brows quite evenly! Will do a separate review for it! (PS. I just edited into the disclaimer that I would do reviews for all the products separately so I don't have to keep mentioning that anymore phew :>)

Next will be the eye products~!!

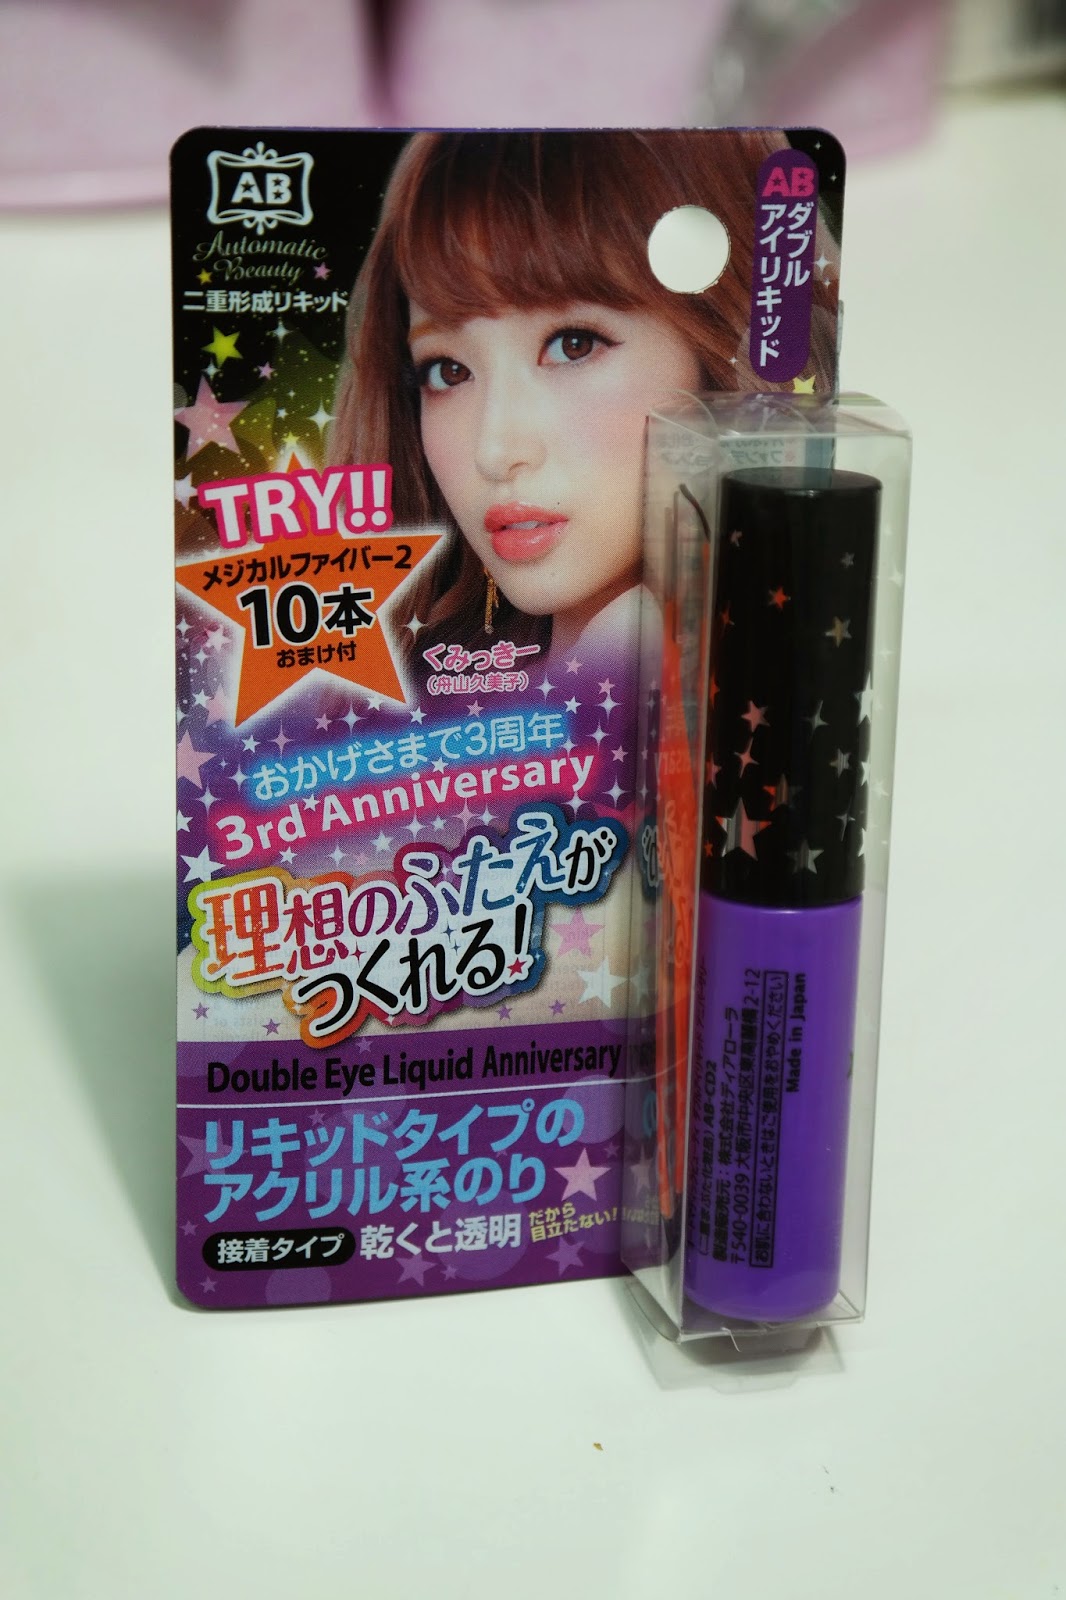
I got this double eyelid glue/tape sort of thing. I'm not too sure because it's a glue but it also gave me eyelid fibre??? O_O I was quite confused. Sorry but I'm not a professional at this because I have never used any eyelid tape whatsoever before, just thought to give it a try after my friends keep telling me about them! I also bought a Heroine Make Eyeshadow Palette! Also bought an eyeliner and a box of fake eyelashes as well! (Don't mention about how I bought two packs of eyelashes a few days ago thanks :>)


I didn't really know which brand was good, I just went for the one that said 3rd Anniversary Special because I thought that if it wasn't good, it wouldn't have lasted in this industry for so long and also, I have weak resistance when it comes to Limited Edition stuff. XD

The Heroine Make Eyeshadow Palette!


One of the main reasons I bought this, is because Singapore doesn't sell this. Also, I have wanted to try out Burgundy/Rose makeup!

This palette is called Rose Garnet and like it's name suggests, it's colour scheme is centred around the Rose looking colours!

Loved the fact that there is a mini tutorial on the back of the packaging to teach me how to use this eyeshadow palette properly~ :>

The eyeliner I bought! :)


I bought this limited edition Sailor Moon eyeliner!! There were various other colours but I chose to buy the one colour that is seemingly out of stock in Singapore... the Sailor Venus, Orange Gold eyeliner~! :)

This was a bargain set. A coloured eyeliner and a normal black eyeliner that is sold at a lower price. Hong Kong sells this set cheaper than Singapore does! The black eyeliner is not pictured above because I gave it away to my aunt~ the colour payoff is amazing by the way. Wish I bought the green Sailor Jupiter one too ):

GORGEOUS EYELASHES ALERT!!


These lashes may look really dramatic and indeed are for daily use, but for cosplay they are just perfect! When I cos, I like to use eyelashes with a hard lash bone because I felt that they would hold my eyes open better, define my double eyelid better and overall, let me look as if I had bigger eyes! (I don't have big eyes naturally so at least let me have my fun through makeup LOL)

Super excited to use them in my shoot in 2 weeks time!!

Lastly, lip products! :D

Bought two lip products from Candy Doll because I wanted them for quite a while and Hong Kong sold them cheaper than Singapore!! :)


Got the Moisture Lip Treatment that I have been interested in for quite a while! Sure hope that it does as it claims! :>

Also got this really beautiful Candy Doll lip gloss in Juicy Cherry!


I have heard quite some stuff about it and though late, it is finally my turn to try it! I normally try to stay away from red lip products because I felt that I wasn't mature enough to pull them off, but now that I have cut my hair off, maybe it's time to give things I normally don't want to touch a try? :)

That's the end of my post!

Thank you for staying to the end of my ramblings!

Here's a picture of me in Hong Kong! When I still had long hair~ :>


Small eyes due to lack of eyelashes!

See why I need to buy so many now?! XD

Cheers,
Diiyawn

Thursday, 5 March 2015

REVIEW | Cath Kidston Makeup Brush Set Review

Hello there~

I was in Hong Kong with my relatives a few weeks ago (last week to be exact), and I was wandering around when I saw a Cath Kidston store and being the sucker for floral prints that I was, I rushed there to browse the products in hopes that the things would be cheaper over there than in SG.

They were slightly cheaper, but that wasn't the best part yet! There were discounts going on and I managed to purchase this beautiful 7 piece brush set for approximately SGD$30! I really love makeup brushes for reasons I know not why and after touching (read molesting :>) the tester brushes, I decided to buy them!

It was my first time hearing of Cath Kidston Makeup Brushes and I went a little :O but since they are selling them in the legit store, I guess that there's no harm in trusting them!

Here is the brush set!

The print is absolutely beautiful!!! Being the hopeless romantic I am, I teared a little as I usually do when I see pretty things. (AM I THE ONLY ONE WHO DOES THAT?)

The brushes comes in a pink lined white pouch with roses printed on it. The pouch is made out of oilcloth, which I felt was a brilliant move on the manufacturer's part because oilcloth can be easily cleaned if it gets dirty, and we all know how easily makeup pouches get, seeing as how the makeup residue on the brushes transfers easily! The pouch is actually a long rectangle that can be folded up into the shape that you currently see it as! Even after folding, the pouch is still relatively flat and doesn't take up much space! Perfect for travelling!

The inside of the pouch looks like this~


I am very amazed that the pattern continues on inside because for most pouches that I know of, the design normally remains on the outside while the inside is like a bleh LOL (in this case, bleh means mundane) 

Each of the brush comes with its very own slot to keep it safe and secure! There is also a plastic flap that covers the top half of the brushes to keep them clean and protected! I have no idea what to feel about the flap honestly because sometimes I'm glad that it's there to keep the makeup residue from transferring while other times, I find it very in my way AHAHAHAHA!!

There is also an extra pouch at the end with a zip for you to store anything else you may need to go together with your brushes!

The brushes out of their pouch!

The brush set consists of 7 brushes! A large fluffy powder brush, a angled powder brush, 2 eyeshadow brushes, an eyeshadow sponge brush, a eyebrow comb brush and a brow brush (?) --> I'm not too sure about that brush.

The brushes, based on the way that they feel, are probably made out of synthetic fibre! They come with a white wooden handle! I sort of wish that they come with their uses engraved on the handle, so that I wouldn't get them wrong EHEHEHEH. I still tend to mix up my brushes at times!


The large fluffy powder brush!

IT WAS SO FLUFFY I COULD DIE!!!

I dont know that if you could tell that the brush is really soft and fluffy from the picture above, but I can guarantee you that it was! The brush is also really densely packed and I think it'll pick up powder really well and will apply your powder on nicely!

The fluffy angled brush! I feel that this would be a good brush for applying bronzer and for contouring your face because its angled and because it's soft yet dense enough that you wouldn't pick up overly much product as well as not scratch your face off LOL. It's as soft and fluffy like the powder brush!

Blushes would would too! Anything would probably work with this brush, I'm just suggesting!


The two eyeshadow brushes and the eyeshadow sponge brush! I grouped them all together because they were all meant for the eyes heh. The first eyeshadow brush has a domed shape and I think it is probably meant for applying eyeshadow all over your eyelid because the area it would cover would be too big for just a specific area.

The second eyeshadow brush is smaller and skinnier and not as dense and it could probably be used as a blending brush or an eyeshadow brush that targets a specific eye area, for example, the crease or something. Still not really good at identifying brushes sorry!

The third brush, the sponge one, I find, is good for picking up and applying glitter all over your eye. The normal brushes I find, do not pick up glitter that easily due to all the spaces they have between the bristles. The sponge is better because it is one flat surface with no spaces between the bristles because it doesn't even have bristles in the first place LOL. This applies to me, not sure how others feel about it!

This is the eyebrow brush and comb! The bristles of the eyebrow brush is pretty well cut and it's firm yet not harsh on the skin! Some eyebrow brushes I find to be really harsh on the skin! Like when you try to brush through your brows, they drag kind of painfully across your skin and irritate the hell out of the skin around your brows and turn them an ugly shade of red tsk. This is fine for me! 

The last brush which I sort of have no idea what it's for. It's sort of rectangular and slightly dense, so maybe a blending brush of sorts? Or maybe a normal eyeshadow brush, concealer brush or maybe even a nose conturing brush? If anyone knows what this brush is for, do let me know! I'll be really grateful! =D


This is a really good brush set and I think this could act as a great starter set for newbies! I'm not too sure if Singapore sells this though! Sorry about that! I am really in love with this brush set because it doesn't have much hair falling out, which is what makes me sad when it happens to brushes.

Thanks for reading!

Sorry if I got too carried away rambling!

Cheers,
Diiyawn